Indoor Air Quality
How to Clean a Window Air Conditioner Safely: What Homeowners Can Do—and When to Stop
Last reviewed August 2026
A clean window air conditioner can support normal airflow and comfort, but the safest homeowner maintenance is limited. Your unit’s exact owner’s manual controls: models differ in how their filter, front panel, drainage, and electrical parts are arranged. If the manual does not expressly permit a task, leave it to a qualified appliance or HVAC professional.
This guide covers manual-approved, user-accessible care only. It does not tell you to remove the cabinet, open an electrical compartment, clean internal coils, use compressed air or chemicals inside the unit, handle refrigerant, or move a heavy window unit by yourself.
Safety first: Unplug the unit before any manufacturer-approved cleaning. Do not rely on waiting a few minutes to make internal electrical areas safe. Do not touch wiring, capacitors, electrical compartments, or sealed-system components.
What You Can Usually Do Safely
The following tasks are appropriate only when they are permitted by the exact model’s owner’s manual:
| Task | Safe homeowner boundary |
|---|---|
| Clean a removable, user-accessible air filter | Remove and clean or replace it exactly as the manual directs. Make sure it is completely dry before reinstalling if the manual permits washing. |
| Wipe accessible exterior surfaces | With the unit unplugged, use a soft cloth lightly dampened with water or a mild cleaner approved by the manufacturer. Do not allow liquid to enter vents, controls, or electrical areas. |
| Remove loose debris from the exterior | Keep the outside of the installed unit clear of loose leaves or debris without opening the cabinet or reaching into fans, coils, or other internal parts. |
| Review the manual’s maintenance instructions | Follow the manufacturer’s instructions for any approved cleaning, seasonal storage, and reinstallation work. |
If a filter is hard to access, damaged, or not clearly identified in the manual, stop and arrange service rather than forcing panels or clips.
A Simple Cleaning Routine
1. Turn the unit off and unplug it
Switch the unit off, unplug it from the wall receptacle, and wait until all moving parts have stopped. Do not clean the appliance while it is operating.
2. Find the owner’s manual before removing anything
Use the model number on the nameplate or manual cover to confirm the approved cleaning method. The nameplate and manual also identify the correct electrical and maintenance requirements for that unit. Do not assume instructions for another brand or similar-looking model apply to yours.
3. Care for the user-accessible filter
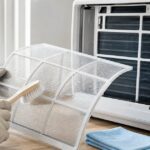
Many window units use a removable filter behind an accessible front grille. If your manual permits it, remove the filter and follow the stated cleaning or replacement instructions. Reinstall it only when it is fully dry if washing is allowed.
A filter that is heavily damaged, moldy, difficult to clean, or not clearly user-serviceable is a reason to consult the manual or arrange professional service. Do not reach beyond the intended filter area into the cabinet.
4. Wipe only accessible exterior surfaces
With the unit unplugged, wipe the exterior casing, louvers, and controls carefully. Keep moisture away from openings, electrical controls, and the power cord. Do not spray water or cleaning product into the unit.
5. Restore power only after the unit is dry and reassembled as designed
Confirm that the manual-approved filter and any intended front cover are correctly in place. Do not operate the unit with panels removed, a wet filter, or a damaged power cord.
What Not to Do
The following actions are outside this article’s homeowner-maintenance boundary:
| Do not | Why the article does not recommend it |
|---|---|
| Remove the casing or access panels | Internal layouts vary and may expose sharp edges, electrical components, and components not intended for homeowner service. |
| Touch or work near capacitors, wiring, or electrical compartments | These components can present an electrical hazard. Waiting a set number of minutes is not a reliable homeowner safety procedure. |
| Spray water, cleaner, or compressed air inside the cabinet | Liquids and forceful air can damage components, move contamination, or create an electrical risk. |
| Use coil cleaner, fin combs, drain probes, or improvised tools inside the equipment | These tasks require exact equipment-specific instructions and can damage delicate components or create a safety issue. |
| Cut, modify, or use a damaged power cord | Electrical repairs and cord damage require qualified service. |
| Remove a heavy window unit alone | Window units can be awkward and heavy. Removal, reinstallation, and support work should follow the manual and use appropriate help. |
ENERGY STAR advises room-AC owners to follow the product instructions, use the insulation materials supplied with the unit, and make sure the unit is level so its drainage system can work effectively. Those instructions are model-specific; they should replace generic “tilt the unit” advice. [1]
When to Stop and Call a Professional
Arrange qualified appliance or HVAC service if you notice any of the following:
- A damaged power cord, plug, control, wiring concern, burning smell, sparking, repeated breaker trip, or other electrical concern.
- A persistent musty odor, suspected mold inside the unit, or contamination that cannot be reached through manual-approved maintenance.
- Bent or damaged fins, broken panels, unusual noise, vibration, water intrusion, or a unit that is not cooling normally.
- A leak, suspected refrigerant problem, ice formation, or any issue requiring access beyond a removable filter or exterior surface.
- A need to remove, reinstall, or support a heavy unit when you cannot do so safely and exactly as the manual directs.
A musty odor or visible material inside an air conditioner is not a reason to open the appliance or apply chemicals inside it. Moisture control is central to mold prevention. EPA advises that a suspected mold-contaminated HVAC system should not be run because it could spread contamination, and that HVAC mold work should be handled by people experienced with HVAC systems. [2] [3]
Keep Your Window AC Easier to Maintain
The best routine is simple: use the manual-approved filter schedule, keep the exterior clear, operate the unit only with its intended panels and filter in place, and address unusual odors, ice, leaks, or electrical problems early. Oversized or improperly installed equipment can also contribute to comfort and moisture problems, so use the manufacturer’s installation instructions and an appropriate sizing process when replacing a unit. [1]
Sources
[1] ENERGY STAR — Room Air Conditioners
Air Conditioner Joint Pain: Can Cold Air Really Make Your Joints Hurt?
You walk into a perfectly air-conditioned room on a sweltering afternoon. The relief is immediate. Cool air washes over your skin. The heat retreats. Your body relaxes.
And then — hours later — your knees ache. Your shoulders feel stiff. Your fingers seem tight and uncooperative.
Coincidence?
Or is your air conditioner secretly aggravating your joints?
Many people report increased stiffness, soreness, or joint discomfort after prolonged exposure to air conditioning. Whether it’s at home, in the office, inside a car, or during long flights, the pattern feels too consistent to ignore.
So let’s explore the truth behind air conditioner joint pain — what causes it, who is most vulnerable, and what you can do to prevent it without sacrificing comfort.
Can Air Conditioning Cause Joint Pain?
The relationship between air conditioning and joint pain isn’t dramatic or catastrophic — it’s gradual, subtle, almost sneaky. You won’t step into a cold room and feel cartilage deteriorating. That’s not how it works. Instead, what happens is more nuanced. Your body constantly adapts to environmental conditions. When the air cools, your nervous system responds. Blood vessels constrict. Muscles subtly brace. Core temperature is preserved. These are protective mechanisms — ancient, intelligent, automatic.
But here’s where things become complicated.
If your joints are already compromised — by arthritis, injury, inflammation, age-related degeneration, or autoimmune imbalance — these protective responses can magnify discomfort. Cold doesn’t create structural damage overnight. It doesn’t grind cartilage away. However, it can amplify sensitivity in the nerve endings surrounding joint capsules. And when sensitivity increases, perception of pain intensifies.
Pain isn’t always about destruction. Sometimes it’s about perception.
And cold environments can heighten that perception in ways that feel very real — even if imaging scans remain unchanged.
Why Cold Air Can Make Joints Hurt
Cold exposure alters more than surface temperature. It influences circulation patterns, muscle elasticity, connective tissue pliability, and even neurological signaling thresholds. The human body thrives within a narrow thermal comfort zone. Deviate from it — especially for prolonged periods — and small physiological adjustments ripple outward.
The deeper issue isn’t that cold “attacks” joints. It’s those joints that rely on optimal surrounding conditions to function smoothly. Cartilage has no direct blood supply. It depends on movement and nearby circulation to receive nutrients. Muscles and tendons support joint stability. Synovial fluid provides cushioning. Disrupt one piece of this ecosystem — such as by lowering circulation or increasing muscle tension — and the entire structure feels less fluid.
That stiffness? It’s rarely random.
It’s the cumulative effect of tiny biological shifts happening beneath the surface. Quietly. Gradually. Persistently.
And over hours in air-conditioned spaces, those shifts can become noticeable — especially to vulnerable individuals.
Cold Temperatures Cause Muscle Tightening
Muscles behave differently in cold environments. Think about stepping outside on a winter morning — your shoulders instinctively rise, your jaw tightens, your posture subtly contracts. That reflexive tightening conserves heat and protects vital organs. But indoors, under steady air conditioning, the same low-grade contraction can persist for hours.
Sustained muscle tension reduces range of motion. It limits joint glide. It increases compressive forces around knees, hips, shoulders, and fingers. Over time, this tension doesn’t just feel stiff — it begins to ache.
Cold muscles also become less elastic. Elasticity matters. Flexible muscle fibers absorb shock. Tight fibers transmit force directly into joint structures. That increased transmission can aggravate cartilage that is already worn or inflamed.
And here’s something many overlook: cold sensitivity varies by body region. Extremities — fingers, wrists, knees, ankles — are especially vulnerable because circulation naturally favors core organs first.
So if your hands ache in an air-conditioned office, it’s not imagined. It’s physiology responding to environmental stress.
Reduced Blood Circulation in Cold Environments
Circulation is everything when it comes to joint comfort.
When exposed to cold air, peripheral blood vessels narrow — a process called vasoconstriction. This helps preserve core body temperature but reduces warmth and oxygen delivery to limbs. For healthy tissues, temporary constriction isn’t harmful. But for joints already under stress, even small reductions in circulation can matter.
Cartilage relies on diffusion — nutrients move in, and waste products move out based on movement and surrounding fluid exchange. When circulation slows, this exchange becomes less efficient. The joint environment can feel thicker, heavier, and less responsive.
Cold-induced vasoconstriction also influences nerve sensitivity. Nerve endings around joint capsules can become more reactive in response to reduced blood flow. That reactivity can translate into increased pain perception — even if inflammation levels remain stable.
It’s not dramatic. It’s incremental.
But hours spent in a chilly office or beneath a strong AC vent can cause enough circulatory reduction to tip the balance from comfortable to uncomfortable — especially in the knees and hands.
Dry Air Worsens Joint Sensitivity
Air conditioners remove moisture as they cool. The result? Crisp air — sometimes excessively dry.
Humidity plays a subtle but significant role in bodily comfort. When indoor air drops below optimal humidity levels, tissues lose moisture more quickly. Skin dries. Mucous membranes are thin. Connective tissues can feel tighter.
While joints are internal, hydration influences the quality of synovial fluid. Synovial fluid acts as a lubricant and a shock absorber inside joints. Though dehydration from AC alone won’t drain joint fluid overnight, chronic low humidity combined with inadequate hydration can reduce overall tissue resilience.
Many arthritis patients report greater stiffness in dry climates compared to humid ones. Scientific studies remain mixed, but anecdotal patterns are strikingly consistent.
Dry air also encourages people to drink less water. Cold rooms suppress thirst signals. That subtle decrease in hydration compounds stiffness.
So sometimes the discomfort blamed solely on temperature is actually a blend of cold, dryness, and mild dehydration—an environmental trifecta.
Inactivity in Air-Conditioned Spaces
Perhaps the most underestimated factor in air conditioner joint pain is stillness.
Air conditioning creates comfort. Comfort encourages sitting. Sitting reduces movement. Reduced movement decreases synovial circulation. And decreased synovial circulation promotes stiffness.
Joints are designed to move. Movement nourishes cartilage by stimulating fluid exchange. Without it, joints stiffen — especially hips, knees, and lower back.
Think of long office days. Long car rides. Cross-country flights. Movie marathons. In each scenario, air conditioning is present — but so is prolonged immobility.
When you finally stand up, joints protest.
It’s easy to blame the cold. But often, cold is simply the backdrop to inactivity.
The solution isn’t abandoning air conditioning. It’s interrupting stillness. Gentle mobility resets circulation. It restores lubrication. It reduces stiffness before it compounds into pain.
Movement isn’t optional for joint health.
It’s foundational.
Who Is Most Affected by Air Conditioner Joint Pain?
Sensitivity to environmental temperature isn’t evenly distributed. Genetics, age, medical history, and inflammatory status all shape how the body responds to cold air.
Older adults, for example, often have reduced muscle mass and slower circulation. That combination makes them more vulnerable to temperature shifts. Even moderate cooling can feel penetrating.
People with rheumatoid arthritis may experience heightened immune sensitivity. Cold exposure can increase subjective discomfort even in the absence of measurable inflammatory spikes.
Individuals with prior injuries often report that “old breaks” or “old surgeries” ache in cold rooms. Scar tissue contains nerve fibers that can react more intensely to temperature change.
Even stress levels matter. Chronic stress heightens pain perception thresholds. Cold exposure layered onto stress can amplify symptoms.
In other words, air conditioner joint pain isn’t random.
It’s contextual.
And understanding your personal risk factors helps you respond strategically rather than reactively.
Air Conditioner Joint Pain at Night: Why Symptoms Feel Worse After Sleeping
For many people, joint discomfort doesn’t peak during the day — it announces itself in the morning.
You wake up stiff. Your knees resist bending. Your shoulders feel locked. Your fingers take several minutes to loosen. And the common denominator? A bedroom cooled all night by steady air conditioning.
Nighttime exposure compounds several factors. First, body temperature naturally drops during sleep. Add cold airflow to that decline, and peripheral circulation decreases further. Second, you remain immobile for hours. Without movement, synovial fluid settles, muscles tighten, and joints become less responsive.
There’s also positioning. If cool air blows directly onto one side of the body, localized stiffness can develop asymmetrically.
The solution isn’t abandoning nighttime cooling — it’s modifying it. Raise the thermostat slightly. Redirect vents away from the bed. Use breathable but insulating bedding. Even small adjustments can dramatically reduce morning stiffness without compromising sleep quality.
The Role of Barometric Pressure vs. Air Conditioning
When discussing cold-related joint pain, an important distinction emerges: temperature versus atmospheric pressure.
Many arthritis sufferers report worsening pain before storms — a phenomenon often linked to drops in barometric pressure. Lower pressure may allow tissues to expand slightly, increasing joint pressure and worsening discomfort.
Air conditioning, however, does not significantly alter indoor barometric pressure.
So why does confusion persist?
Because both cold weather and air conditioning create similar sensory experiences — coolness, dryness, and subtle constriction. While barometric pressure shifts occur outdoors, AC primarily affects temperature and humidity. Yet the body’s response — stiffness, aching, heaviness — can feel comparable.
Understanding the difference matters. If your symptoms worsen indoors regardless of outdoor weather patterns, temperature, and humidity, they are likely the triggers. If discomfort spikes before rainstorms regardless of indoor climate, pressure sensitivity may play a larger role.
Sometimes the cause is environmental. Sometimes atmospheric. Sometimes both.
Can Air Conditioner Joint Pain Be Prevented Long-Term?
Short-term solutions like layering clothing and stretching help. But what about long-term resilience?
Building joint tolerance to environmental shifts requires strengthening the surrounding structures. Strong muscles stabilize joints. Stable joints experience less stress under temperature fluctuations.
Regular strength training — even light resistance work — improves circulation efficiency and tissue resilience. Mobility exercises maintain joint glide. Low-impact activities like swimming or cycling stimulate lubrication without excessive strain.
Diet also plays a role. Anti-inflammatory nutrition patterns rich in omega-3 fatty acids, leafy greens, antioxidants, and adequate protein support connective tissue health. Hydration remains foundational.
Over time, a body that moves well, hydrates consistently, and maintains muscular support becomes less reactive to mild environmental stressors — including cold indoor air.
You may not control every thermostat.
But you can strengthen the system that responds to it.
Air Conditioner Joint Pain in Office Workers
Modern workplaces are notorious for aggressive air conditioning.
Conference rooms feel arctic. Open offices circulate constant cool air. Employees sit for hours beneath ceiling vents.
The combination is potent: static posture, repetitive typing, lowered circulation, and localized cold exposure — especially to hands, wrists, shoulders, and knees.
Over weeks and months, minor stiffness can accumulate into chronic discomfort. Not necessarily because the AC is “harmful,” but because environmental conditions compound occupational strain.
Ergonomic adjustments become crucial. Keep a light sweater at your desk. Use wrist supports. Take hourly micro-breaks. Perform discreet stretches — wrist circles, shoulder rolls, ankle pumps.
Office joint pain often masquerades as temperature sensitivity when it’s actually due to temperature, posture, and repetition.
Address all three, and symptoms often diminish.
Air Conditioner Joint Pain in Cars and Long Drives
Long car rides introduce a unique pattern of joint discomfort.
The AC blows directly onto the knees and hands gripping the steering wheel. Lower body circulation decreases due to prolonged sitting. Vibrational micro-movements strain the hips and lower back.
Stiffness develops after several hours of driving, particularly in older people or those with arthritis.
To reduce discomfort during travel:
- Adjust vents away from direct joint exposure.
- Take stretch breaks every 60–90 minutes.
- Perform seated ankle flexion exercises.
- Slightly warm the cabin after initial cooling
Temperature control in vehicles is often more aggressive than necessary. Moderate settings can preserve comfort without increasing the risk of stiffness.
Joint health during travel isn’t about eliminating cooling. It’s about avoiding prolonged cold concentration in one area.
Psychological Factors: Does Expectation Influence Pain?
Pain perception is not purely mechanical. It is neurological. Contextual. Psychological.
If someone strongly believes cold environments worsen their arthritis, anticipation alone can heighten symptom awareness. This does not mean the pain is imagined — it means the brain’s pain-processing centers are sensitive to expectation.
Research shows that cognitive framing influences pain thresholds. When individuals expect discomfort, neural circuits become more alert to sensory signals.
Conversely, when people understand the mechanisms behind stiffness — and feel empowered to manage them — perceived severity often decreases.
Knowledge alters experience.
Understanding that air conditioning doesn’t damage joints but may temporarily influence circulation and muscle tension can reduce anxiety-driven amplification.
Sometimes, reassurance is therapeutic.
Natural Remedies for Air Conditioner Joint Pain
For those seeking non-pharmaceutical approaches, several natural strategies can complement environmental adjustments:
Gentle Yoga: Encourages circulation, flexibility, and relaxation of the nervous system.
Turmeric and Ginger: Contain anti-inflammatory compounds that may support joint comfort.
Epsom Salt Baths: Warm water combined with magnesium sulfate can ease muscle tension.
Compression Sleeves: Provide warmth and mild support for knees, wrists, or elbows.
Infrared Heat Therapy: Penetrates tissues more deeply than surface heat.
While these remedies don’t “cure” underlying joint conditions, they may reduce sensitivity triggered by cold exposure.
Consistency matters more than intensity.
Small daily rituals often outperform sporadic aggressive interventions.
Frequently Asked Questions
Does air conditioning cause arthritis?
No. Air conditioning does not cause arthritis. It may temporarily increase stiffness in individuals with pre-existing joint sensitivity.
Why do my knees hurt in cold rooms?
Cold exposure can reduce circulation and tighten surrounding muscles, increasing compressive stress on knee joints.
Is sleeping in an AC bad for joints?
Not inherently. However, very low temperatures combined with immobility may increase morning stiffness.
Should people with arthritis avoid air conditioning?
Avoidance isn’t necessary. Strategic control of temperature, movement, and humidity is more effective than elimination.
Conclusion
Eliminating air conditioning entirely isn’t the answer — especially in regions where extreme heat poses real health risks. Heat exhaustion and dehydration can be far more dangerous than mild joint stiffness.
The smarter approach is calibration.
Instead of extremes — icy indoor climates or sweltering rooms — aim for balance. Adjust temperatures modestly. Layer clothing thoughtfully. Prioritize circulation. Hydrate consistently. Add humidity if necessary. Most importantly, move.
Joint health isn’t determined by one variable. It’s shaped by temperature, activity level, hydration, inflammation status, muscle tone, sleep quality, and stress management. Air conditioning is one piece of a larger ecosystem.
And ecosystems require balance, not elimination.
When managed wisely, you can enjoy cool comfort without sacrificing mobility. Awareness replaces frustration. Small adjustments prevent large discomforts.
Your environment should support your body — not silently challenge it.
Air Conditioner Lines Are Frozen: Safe Steps to Take Before You Call for Service
Last reviewed August 2026
Ice on an air-conditioner refrigerant line, outdoor unit, or indoor coil area is a sign that the system needs attention. The safest first move is not to diagnose the sealed refrigerant system yourself. Turn cooling off, avoid disturbing the ice, and use only simple homeowner-safe checks.
Do this first: Switch cooling off. Do not scrape ice, apply direct heat, remove access panels, connect gauges, add refrigerant, bypass controls, or try to force the system to restart.
Why Ice Can Form
Frozen lines can be associated with restricted airflow, a dirty user-accessible filter, blocked normal-use vents, a refrigerant issue, a control problem, or another equipment fault. These possibilities overlap, and an article cannot determine the cause remotely. The key question is whether there is an obvious, safe homeowner action—or whether the system needs qualified HVAC service.
Use the term refrigerant, not “Freon,” unless you are quoting the exact product documentation. “Freon” is a trademark used historically for several refrigerants; the exact refrigerant for a system is typically listed on the equipment nameplate or in its manual. [1]
Safe First Steps
1. Turn cooling off
Use the thermostat or system control to stop cooling. Do not continue operating a system with visible ice in an attempt to “push through” the problem. Leave all access panels in place.
2. Do not disturb the ice
Do not chip, scrape, puncture, or heat the ice. Do not use a hair dryer, open flame, sharp object, or chemical product. These actions can damage equipment or create an electrical, water, or refrigerant hazard.
3. Check only user-accessible airflow items
If it is safe and ordinary for you to do so, check these items:
| Homeowner-safe observation or action | Boundary |
|---|---|
| User-accessible filter | Replace or clean it only as the equipment manual directs. Do not remove equipment panels to reach a filter. |
| Normal-use supply and return vents | Confirm they are not blocked by furniture, rugs, or other ordinary obstructions. Do not open ductwork or disturb insulation. |
| Visible water | Note water around the indoor equipment, drain area, or floor. Do not probe or flush drains. Take a photo if useful for the service visit. |
| Outdoor debris | Observe loose leaves or debris around the outside unit without opening the cabinet or reaching inside it. Do not touch the fan, coil, wiring, or refrigerant piping. |
If the cause is not clearly limited to a dirty user-accessible filter or a normal-use vent obstruction, stop the homeowner checks and arrange service.
When to Call a Qualified HVAC Professional
Schedule qualified HVAC service promptly if any of the following applies:
- The system freezes again after a simple, manual-approved filter or vent correction.
- You suspect a refrigerant leak, see oil-like residue, hear an unusual hissing sound, or the system is not cooling normally.
- A breaker trips, there is a burning smell, a power cord or electrical component looks damaged, or an error message appears.
- Water is causing or may cause property damage.
- The indoor coil, refrigerant lines, or inaccessible components are frozen.
- You are not sure what the system is doing or which action is safe.
EPA requires technician certification for work on equipment that could release refrigerant. EPA specifically identifies attaching gauges or hoses to measure pressure and adding or removing refrigerant as technician activities. [2] Do not buy refrigerant, connect gauges, cut lines, or attempt a recharge. If a leak is found, ask the service provider to locate and repair it rather than simply repeatedly adding refrigerant. [1]
What to Tell the Service Provider
Useful details can reduce guesswork. Before the appointment, note:
- Where you saw ice and when you first noticed it.
- Whether cooling performance changed before the ice appeared.
- Whether you changed a user-accessible filter or removed a normal-use vent obstruction.
- Whether there is visible water, an odor, a breaker trip, a warning message, or unusual noise.
- The system’s brand, model number, and any information on the nameplate that can be read without opening equipment.
Do not attempt to identify refrigerant pressures or open the system to collect more information.
Preventing a Repeat Problem
Prevention begins with the equipment’s own maintenance instructions. Keep user-accessible filters maintained according to the manual, avoid blocking normal-use supply and return vents, and schedule professional maintenance when recommended for your system. Maintenance does not eliminate every problem, but it helps identify issues that are not safe or practical for a homeowner to diagnose.
Sources
[1] EPA — Homeowners and Consumers: Frequently Asked Questions
Suspected Mold or Musty Odor in an Air Conditioner: What Homeowners Should Do
Last reviewed August 2026
A musty odor, dark spotting, or visible material near an air conditioner can be concerning. It is not, however, a reliable way to identify a mold species. Molds can appear in many colors, and appearance alone cannot tell you whether a substance is a particular species or predict a person’s health response. [1] [2]
The practical next step is to focus on moisture, safe scope, and appropriate professional help—not on a color label or a do-it-yourself attempt to reach internal HVAC components.
If you know or suspect that a central HVAC system is contaminated with mold, do not run it until an appropriately experienced professional advises otherwise. EPA says operating a mold-contaminated HVAC system can spread mold through the building. [1]
Start With a Safe Assessment
Without opening the appliance or disturbing suspected contamination, consider what you can observe from the outside:
| What you observe | Safe next step |
|---|---|
| Musty odor when the system runs | Stop using a central system you suspect is contaminated and arrange professional evaluation. For a window unit, turn it off and unplug it before any manual-approved exterior/filter care; do not dismantle it. |
| Visible material near an intake, supply vent, drain area, or accessible surface | Do not identify it by color, vacuum it, spray it, or apply chemicals inside equipment. Take a clear photo from a safe distance and arrange evaluation. |
| Water damage, repeated moisture, or condensate problems | Address the water or moisture source promptly. Do not probe internal drain components or open equipment cabinets. |
| Occupants with health concerns | Avoid self-diagnosis from an article. Seek appropriate medical guidance, and use a qualified professional for the building/equipment issue. |
EPA identifies moisture control as the key to mold control. If mold is present, the mold must be addressed and the water problem fixed; otherwise the problem can return. [1]
When Professional Evaluation Is Appropriate
Professional evaluation is the prudent path when any of the following applies:
- You know or suspect a central HVAC system is contaminated.
- The odor or visible material returns after the apparent moisture source is addressed.
- Mold or water damage may involve ductwork, insulation, internal equipment, or other porous materials.
- There has been substantial water damage, contaminated water, or a large/complex affected area.
- You cannot reach the area through manufacturer-approved homeowner maintenance.
- Anyone in the home has health concerns associated with the exposure.
EPA notes that an affected area under about 10 square feet can often be handled by a homeowner in ordinary circumstances, but it separately identifies suspected HVAC contamination, substantial water damage, contaminated water, and health concerns as situations requiring extra care. [1] Do not treat the 10-square-foot guideline as permission to clean inside HVAC equipment.
For central-HVAC mold remediation, EPA’s training guidance states that work should be done only by professionals experienced with HVAC systems. [3]
What Not to Do
Do not attempt the following in response to suspected mold or a musty odor in air-conditioning equipment:
| Do not | Why |
|---|---|
| Diagnose “black mold” or a particular species by color | Mold color is not a reliable species or risk diagnosis. [1] [2] |
| Open access panels, remove a cabinet, or disturb duct insulation | This can expose you to hazards and spread contamination. |
| Vacuum, brush, scrape, or blow air through suspected internal contamination | Disturbing material may spread it and is outside safe homeowner scope. |
| Spray bleach, biocide, coil cleaner, fragrance, or other chemicals inside equipment | Chemicals are not a substitute for moisture control and safe removal; they can create additional hazards. EPA does not recommend biocides as routine mold-cleanup practice. [1] |
| Rely on UV-C, air fresheners, or a filter change as a cure for suspected HVAC contamination | These measures do not replace assessment, moisture correction, and appropriate remediation. |
| Order mold testing solely to identify color/species | CDC does not recommend routine mold testing for home decisions; the response is to safely remove mold and correct moisture. [2] |
Health Information Without Self-Diagnosis
Damp or moldy environments may affect people differently. EPA and CDC describe possible allergic or irritant effects, including nasal, throat, eye, skin, cough, or wheeze symptoms; people with asthma, mold allergies, immune compromise, or chronic lung disease may need particular care. [1] [2]
This article cannot tell whether a symptom was caused by mold or an air conditioner. If you have health concerns, consult an appropriate health professional rather than using home testing, mold color, or an online article to diagnose yourself.
Preventing a Repeat Problem
The prevention focus is moisture control:
- Address leaks, standing water, and repeated condensation promptly.
- Keep air-conditioning drip pans clean and drain lines unobstructed through qualified maintenance where the equipment or manual requires it.
- Keep indoor relative humidity below 60% when possible; EPA identifies 30–50% as an ideal range. [1]
- Follow the exact model manual for user-accessible filters and exterior care.
- Do not operate a covered, wet, damaged, or visibly contaminated unit.
If the unit is a window air conditioner and the manual provides a limited, user-accessible filter-care procedure, that is the boundary for homeowner maintenance. Internal coils, fans, drains, electrical compartments, and refrigerant components remain professional-service territory unless the exact manual expressly states otherwise.
Sources
[1] EPA — A Brief Guide to Mold, Moisture and Your Home
[2] CDC — Mold